

First I must confess that this is a project I could never have imagined having any interest in, especially as I’m still finding my way with knit fabrics, but, having watched a gym performance at school recently, the importance of a well fitting leotard was clear. For H, a child with a non-average build, custom making one seemed to be the only way of ensuring a good fit. H was delighted at the suggestion and set about drawing a design which took me by surprise. As a child who professes her dislike of anything she deems ‘jazzy’ and who is constantly encouraging me to tone down my ideas and enthusiasm, a long-sleeved leotard in electric blue with gold zigzag down the front was not what I was expecting.
This was my first attempt at a leotard so I did make a few mistakes, but contrary to what the title of this post suggests, I also did a few things right, including…
- Choosing material with 4 way stretch (which means the fabric stretches along the grain and across it). With H’s help I picked a blue stretch velvet (I purchased 1/2 a metre online from Tia Knight fabrics) and some gold lame which I already had.
- When cutting the stretch velvet I made sure the direction of the pile was the same all the way round the garment.
- I drafted a pattern to H’s measurements and included negative ease (although not loads as I wanted there to be some room for growth). I used the vest and knicker blocks from Aldrich’s metric pattern cutting for children’s wear as a starting point for the pattern and made sure the cut at the leg openings was very low.
There were however lots of things I should have done which I didn’t, including…
- Making a muslin to test the fit of the pattern. I rarely bother with muslins as I’m an impatient sewer and find that unless they are made in a very similar fabric the fit comes up differently anyway. I didn’t make a muslin for the leotard but luckily, thanks to lots of measuring while making the pattern, the fit turned out pretty well anyway.
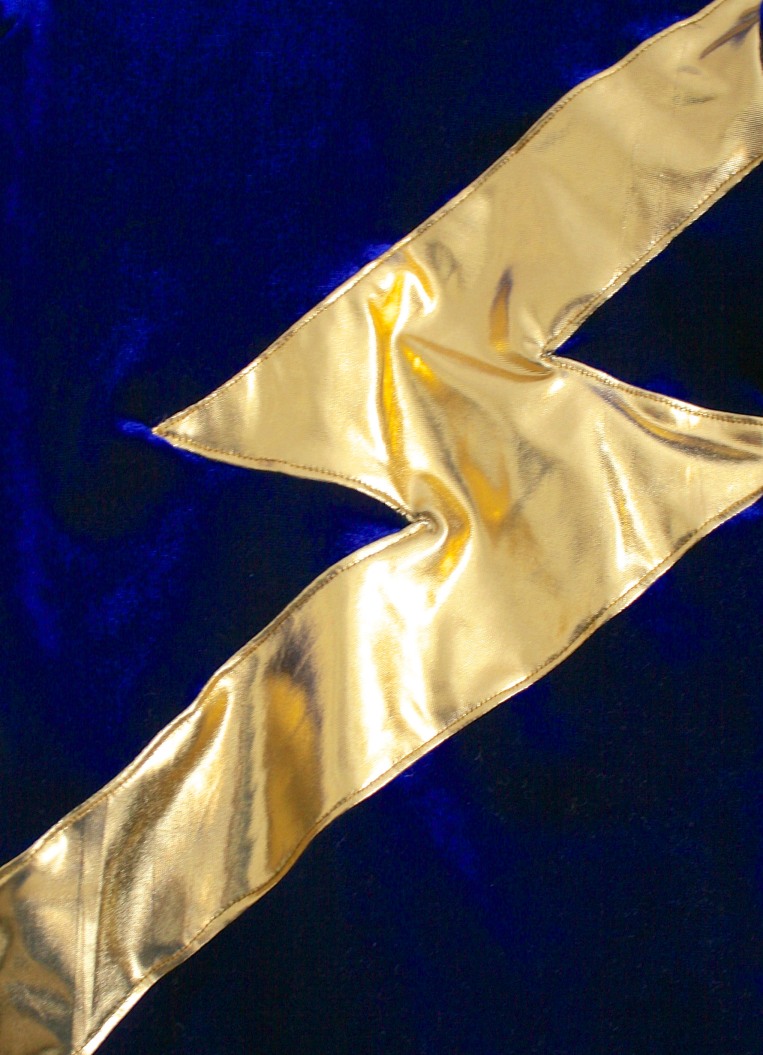
- Testing how the fabric sewed before I cut the material and finalised the design. My sewing machine has never liked sewing knits (whatever method I try) so I have only really made progress with stretchy fabrics since buying an overlocker which makes it seem easy. I assumed when I cut the pieces for the front zigzag design that I would be able to piece those bits together using my sewing machine so that I could get the fiddly corners right but that turned out to be impossible. As the lame and velvet went through my machine it could not be persuaded to sew, skipping 19 out of every 20 stitches (even though I was using a brand new stretch needle). In the end I had to resort to using the overlocker which didn’t allow enough accuracy in the corners and left me with the puckers in the inner corners you can see in the picture below. Thanks to the negative ease in the pattern, they are almost unnoticeable when the leotard is being worn, but still, grrrr. Which leads me to…
- Picking a straightforward design with straight lines for a first attempt. If I had just gone for a straight asymmetric band across the front I would have saved myself a great deal of trouble and ended up with a more professional finished product.
Still, H is very happy with the realisation of her design, and for me, mistakes made are lessons learned, so if or when I need to make another leotard I’ll feel much more confident about how to go about it.

It still looks like a young girl will adore it! I wonder if the front done in a single piece of velvet with appliqued zigzag would work?
I wondered the same think, in fact I still do – the reason I didn’t try it is that because both materials were both slippy and stretchy I thought that the applique section might wander quite a lot while I sewed and cause other problems, or that if I used bondaweb the fabric might not stretch enough. Still not sure though.
I am not very advanced when it comes to sewing, but I’ve started to make these for my kids. Last fall, I was really into quilting and when I did some applique, I used a fabric glue stick to stabilize the applique before sewing. It washes out. Something to consider in the future.
Thanks for the tip – perhaps I’ll try it that way next time.
also, this is totally adorable. I love the sassy gold! you did a great job! 😀
I think if you wanted to use a bonding agent to hold in place. Then attach using sewing machine. Then cut fabric out from appliqué allowing for seam allowance.
Thanks for the suggestion!
I might give leotards a try… I did make a swimsuit once, which turned out well, and now our eldest is becoming a gymnastic fanatic… Like the design!
Swimsuits are on my list for this year too, hopefully this will have been good preparation…
We are our worst critics, aren’t we? I think it looks amazing! And such a great attitude to have about learning from each project! Great job!
I work a lot in art education and accepting frustration as part of the creative process is something I’m always trying to convey. However it is much easier said than done!
I think this is fantastic, even though it has mistakes. One, your little girl loves it,and two, you realized a design from a child’s drawing. How awesome is that! I know I would have been thrilled as a child if my mom or grandmother sewed up something from a drawing I made. Also, this is super jazzy!
Oh thank you – she really does love it, but might be getting a little too used to having things custom made to her requirements!